Introduction
This document contains a step-by-step process for installing the Commotion software on MikroTik routers. If you have a new, in-the-box MikroTik device, this guide is for you.
We have written this guide because the Open Technology Institute is expanding Commotion router software support for MikroTik routers. The software is an alternative operating system, similar to Linux for +your home or office computer. MikroTik hardware comes from the factory installed with their custom software, called RouterOS - just like a new computer usually comes with Microsoft Windows or Mac OSX installed. Installing Commotion on your router instead will add new features to your router, including the ability to mesh with other routers that use Commotion.
The instructions for installing Commotion on MikroTik devices are much more complicated than those for Ubiquiti or TP-Link hardware. The guide assumes you are familiar with Linux and working on the command line. The installation process should take about an hour, or longer. If these steps do not work for you, or if you have a router that failed to properly flash Commotion or will not respond in any way, then please see the External Resources section.
Time required: 1 hour or more.
Materials + Supplies Needed
To install Commotion, you will need the following items on-hand:
- A computer with an Ethernet port.
- The MikroTik router and its power supply (or a 24V PoE supply).
- Access to a power outlet.
- One Ethernet switch with two open ports.
- Two Ethernet cables.
- A computer with a serial port, or a USB-to-Serial adapter.
- A serial cable to connect to a DB-9 male serial console
- An Internet connection or the appropriate Commotion software image.
If your computer doesn’t have a serial port, you will need a USB to serial adapter. Some examples of these can be found in the External Resources section.
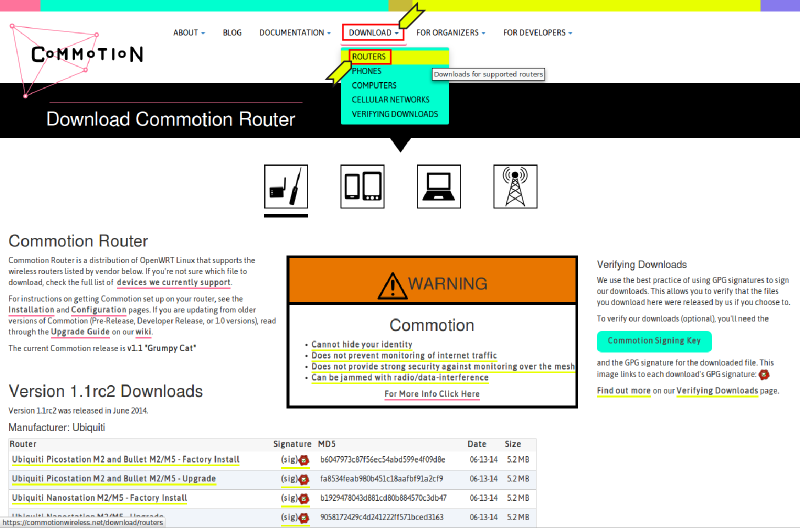
Download Commotion
Download the MikroTik Commotion images for your hardware:
https://commotionwireless.net/download/routers
You will need three files to fully install Commotion on your MikroTik routerboard device:
- openwrt-ar71xx-nand-vmlinux-initramfs-lzma.elf
- openwrt-ar71xx-nand-rootfs.tar.gz
- openwrt-ar71xx-nand-vmlinux-lzma.elf
Save the file somewhere you can access easily later. A good place to save the file is on your Desktop, or in your Downloads directory.
Configure your computer
The Commotion software cannot be written directly to the router’s storage via the update system in Mikrotik's RouterOS. So installing Commotion is a two step process:
- First, boot the router from a DHCP server on the local area network. A TFTP server then provides an .ELF firmware file that is loaded into the router's memory.
- Second, a Web server provides a separate firmware file on the local area network for permanent installation.
These server packages must be installed on whatever computer you are installing the Commotion software from. For a guide on installing and running these servers, please see the MikroTik Installation Server Setup. Read through and perform the necessary steps in those instructions before coming back to this document and proceeding with the installation.
Setup the Hardware
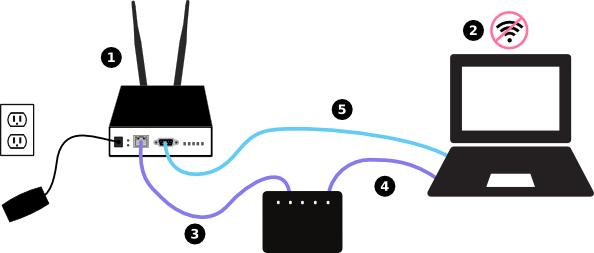
- Unpack the MikroTik router and install the external antennas (if the unit has them).
- Turn off your computer’s Wi-Fi, if it is on.
- Plug in one Ethernet cable to the Switch, then plug that cable into your computer’s Ethernet port.
- Plug in a second Ethernet cable between the Switch and the Ethernet port on the MikroTik router.
- Plug in the USB-to-Serial adapter to your computer, and connect the DB-9 connector to the Serial Console port on the MikroTik router.
Don’t plug in the router yet - there are a few more setup steps.
Setup the Serial Console
If you don’t have a terminal program that can access serial port consoles installed, you can use minicom or something similar. Open a terminal and install the package by typing the following:
sudo apt-get install minicom
You will need to configure minicom to the proper port and data-rate for your MikroTik router. Run the following command in the terminal:
sudo minicom -s
You will be presented with a setup menu:
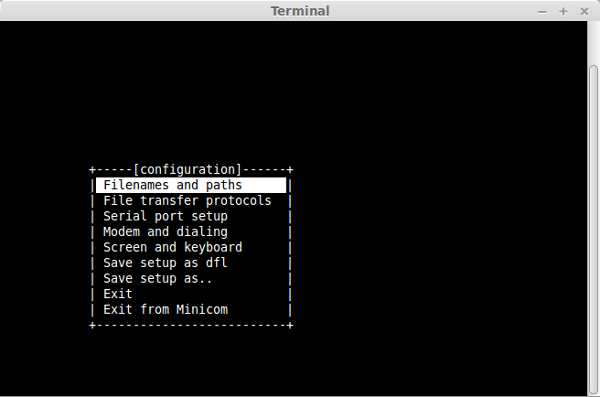
Use the arrow keys to move down to the “Serial Port Setup” menu and hit enter. Here you can change the serial port to the address the USB-to-Serial adapter uses. Type “a” and change /dev/xxx to /dev/ttyUSB0 (for most USB-to-Serial adapters). Hit enter and then “e” to change the bit rate. Type “E” again to select the 115,200 bps rate, and leave the flow control to 8 bits, no parity, 1 stop bit (8N1). Hit enter to exit back to the previous menu. Hit enter again to return to the previous menu.
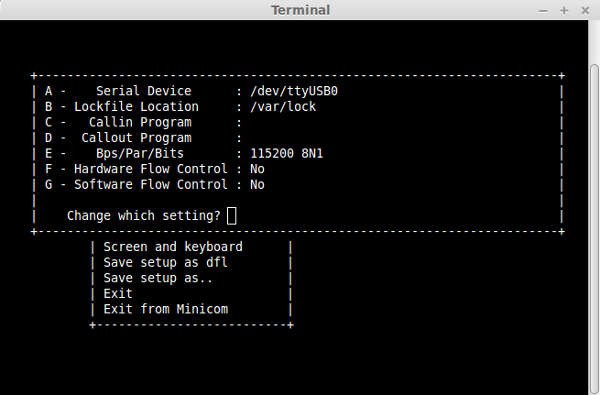
At this point we can save the settings. Scroll down to “Save setup as dfl” and hit enter. This will save your changes as the default settings for the program.
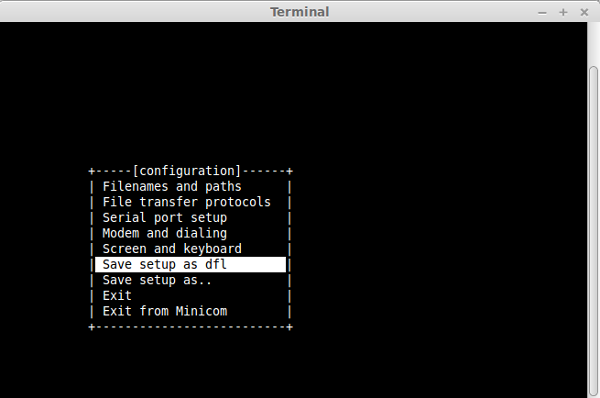
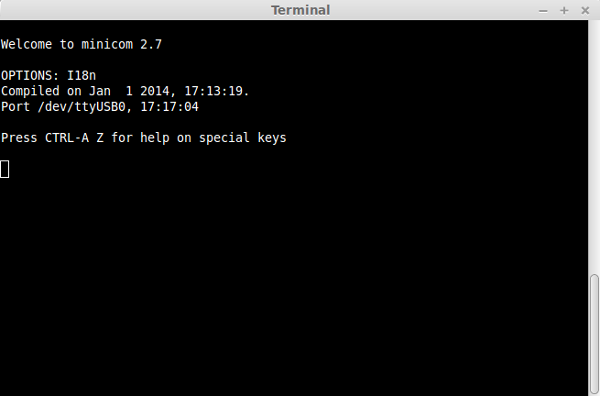
Scroll down to “Exit” and hit enter. You will be moved to the minicom program, which will be waiting for input from the serial port. Leave this terminal window open to be ready for the next set of steps.
Load the software to memory
If you haven’t started the Netboot and Web server packages on your computer, do that now. Also make sure your Ethernet interface has the static IP address 192.168.10.254. If you used the configuration file provided and steps shown in MikroTik Installation Server Setup you should be ready to go.
Once you have the servers installed and running, plug the power adapter into an easily accessible wall outlet or power strip, then the DC power jack (or PoE Ethernet cable) on the router. If there is a power button, depress it to turn the router on.
You should begin to see text in the terminal window running minicom, showing the MikroTik router’s boot process.

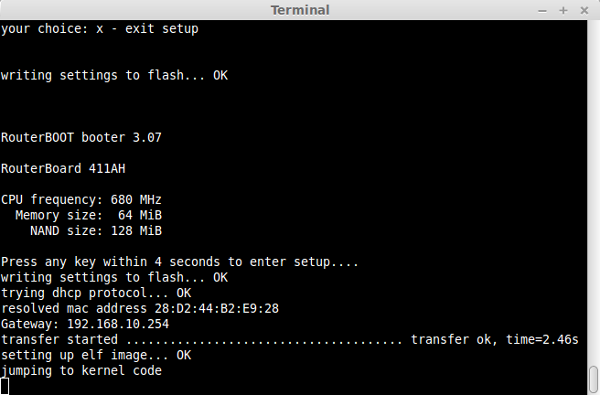
Quickly hit any key on your keyboard to enter the router’s boot menu (you only have a few seconds). If you miss it, disconnect and reconnect the power to the router and start over. If you hit a key in time, you will see the menu:
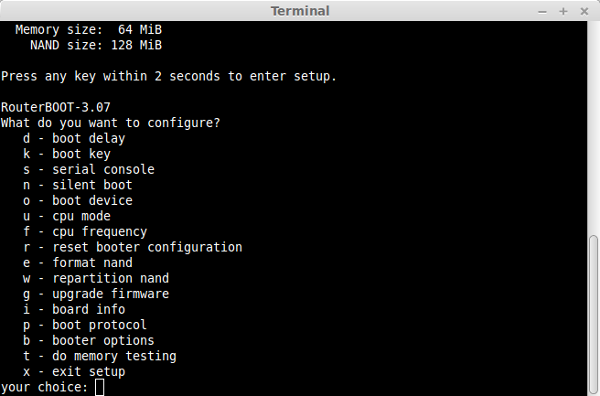
This is a special menu that is only accessible over the Serial Console - which is why you need the extra cable.
Next, select o - boot device and then select 1 to boot once from the network (the computer you set up with the DHCP, TFTP and Web server), and then boot from the nand after that.
Select x to exit setup.
The router will reboot. Don’t hit a key this time, let the bootloader menu time out. Your computer should give the device a DHCP lease, recognize its MAC address and the device will boot from the file hosted in:
/var/lib/tftproot/
This will happen very fast, then the Commotion router software will start to boot.
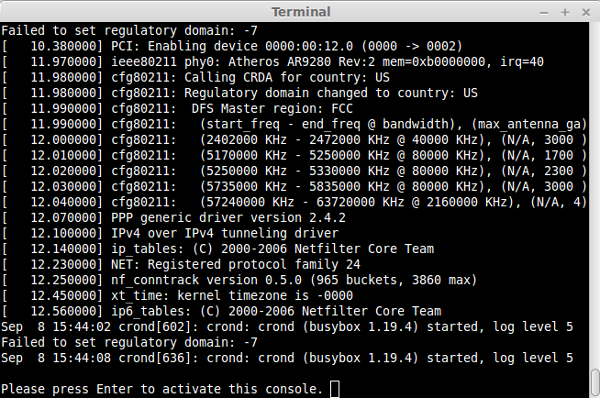
A large number of messages will print to the screen as Commotion boots. When the screen stops updating for a while, or you see the message “Please press Enter to activate this console” on the serial terminal screen, Commotion has fully booted. Hit Enter.
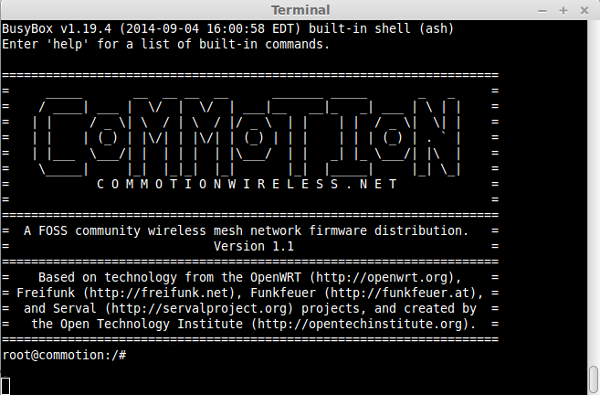
You will see the following Commotion banner, if all went well:
If it does not boot from the network, re-check your configuration in:
/etc/dnsmasq.conf
and look at the messages in
/var/log/syslog
to diagnose the issue Assuming the device booted from the network, you should see the Commotion text banner and command prompt.
</section>Install the software to flash
At this point, your routerboard is running Commotion in memory. To permanently install Commotion to the device's NAND flash (similar to a computer hard drive), the files must be loaded from the web server running on your computer.
In the serial console, check if your Commotion router received an IP address from the dnsmasq instance on your computer. Run the command:
ifconfig eth0
If the router has an IP address, it should look something like:
eth0      Link encap:Ethernet  HWaddr aa:bb:cc:dd:ee:ff
          inet addr:192.168.10.101  Bcast:192.168.10.255
          UP BROADCAST RUNNING MULTICAST  MTU:1500  Metric:1
          RX packets:1019 errors:0 dropped:0 overruns:0 frame:0
          TX packets:4400 errors:0 dropped:0 overruns:0 carrier:0
          collisions:0 txqueuelen:1000
You can proceed to the next installation step, wget2nand. If your router doesn't receive an IP, set an IP address for the Ethernet interface on the node statically. Run this command:
ifconfig eth0 inet 192.168.10.100 netmask 255.255.255.0
After this, you can load the image files from the computer to the note. This command assumes that your computer's IP address is 192.168.10.254, as recommended in the guide above:
wget2nand http://192.168.10.254/
If successful, your serial console should display information indicating that the device is being flashed, and eventually it will reboot.
Once the device is rebooting, use the commands below on your computer to turn off dnsmasq and lighttpd:
sudo service dnsmasq stop
sudo service lighttpd stop
You should now set your computer’s Ethernet port to receive an IP address via DHCP. When the router has completely rebooted, it will provide your computer with a DHCP lease. Once this has happened, you can open a web browser, and in the URL bar enter http://thisnode - the address of the administration page on the Commotion node. Next, run the Commotion setup wizard and configure the settings for your network. If you want to read more about this process, see the document Configure Commotion.
External Resources
If your computer doesn’t have a Serial port (most computers made in the past 5 years do not), you will need a USB to serial adapter, such as these models:
- Sabrent USB 2.0 TO Serial DB9 male - model # CB-RS232
- TRENDnet USB to Serial Converter - model # TU-S9
- StarTech USB to RS232 Serial DB9 Adapter - model # ICUSB232PRO
In addition, you will likely need a DB-9 “turnaround” - also known as a gender changer, such as these:
- Tripp Lite DB9 F/F Gender Changer - model # P150-000
- StarTech DB9 RS232 Serial Null Modem Adapter F/F - model # NM9FF